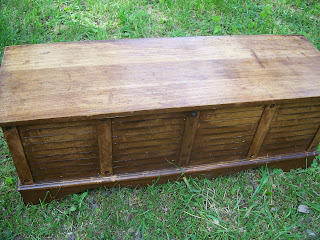
 When I first got engaged, my dad gave me this old wooden trunk. Its been in our hallway at my dads since as long as I can remember. He would always tell my sister and me that we could have the trunk when we got older. Well my sister got another dresser and I got the trunk, but not before my brother could put it in his room and use it as a coffee table. I talked it up so much, and when I first got it and showed it to Martin, he was like "ehh?" The edges were worn, the top had coffee rings, burnt holes and some other weird gook stuff (I have a very messy brother). I committed myself to fixing this baby up. We've kept for awhile and last week I finally had some extra time to refinish it! First thing to do when refinishing any piece of furniture is to make sure you have safety equipment - I used gloves, a mask and goggles. Next you will need a paintbrush, a stripping tool (metal or plastic), stain (or paint, whichever you'll be using to bring its new life) and something like this paint stripper (about 10$):
Don't be fooled by its pretty orangey color, this stuff is DEADLY. We used a green gel that was mint smelling. With everyone inside, including Lealu the puppy, I put on all my gear and started loading on the stripping gel with my paintbrush. An important note is that when your putting this stuff on wood, you want to stay with the grain, that way when you use your stripping tool, you won't catch grains of wood and cause nicks.
With the paint stripper you just want to push the stripper tool away from you so that the gel and paint/stain begins to come up in globs with the gel. I had a rag next to me that I would wipe the tool with when it got loaded with globs. Its so important to be safe with this stuff because it is highly toxic. Even with my gloves and other protective gear, I accidently wiped my arm area that didn't have glove on the rag, and that night broke out in a nasty rash in that spot. It went away overnight but can you imagine that 10x worse!? Definetly some emergency room stuff would be happening. After all the gel and stain came off the trunk, I left it overnight. The next morning I made sure all globs were off the trunk and just went over it with a new wet rag to make sure. After making sure its all glob free and dry, I started to stain with cherry mahogoney wood stain. I ended up doing almost 3 coats of it and it came out exactly like I wanted, shiny and dark!


What a great project! You did save it from the grave!
ReplyDeleteWow! That came out beautiful! I can't even imagine what a piece like that would cost straight from a furniture store. Nicely done. You are one of the few blogs I have seen that include specifics like materials and product. That's helpful too.
ReplyDeleteThat is a remarkable furniture! What a great tip, Nikki.
ReplyDeleteIt did come out wonderful! :)
Thank you.
B xx
What a beautiful piece of furniture.
ReplyDeleteOoh! It is pretty! I used to love to strip and refinish furniture but haven't done it since the kids came around.
ReplyDeleteyep, you did it! I love it! I think it is cool that you took the time to do that!
ReplyDeleteOh wow - came out great!!
ReplyDeleteSuper impressive!!! I am glad you posted this. I am always happy to learn about another DIY project that doesn't require a ton of skill or equipment.
ReplyDeleteI love it!!! I love reading about people who re-purpose old items and make them look new again. I agree I like the dark stain you did! Great job!!
ReplyDeletepretty pretty and i want you to come and refinish everything i can find!:)
ReplyDelete